What Choose Your Own Adventure asks students to do:
- review a plot of the play
- write prose paraphrasing the poetic drama
- show an understanding of the plot following one character
- creatively write deviations from the main plot
- determine a potential theme of the play and how the theme changes if a character's actions change
- use Hyperlinks within a presentation to go to non-linear slides
Day 1: create cards for accurate timeline
Day 2: create cards for deviations
Day 3: set up slides and hyperlinks
Day 4: draft accurate timeline
Day 5: draft deviations
Day 6: beta testing with revising
Day 7: submission
Overview:
Day 1: create cards for accurate timelineDay 2: create cards for deviations
Day 3: set up slides and hyperlinks
Day 4: draft accurate timeline
Day 5: draft deviations
Day 6: beta testing with revising
Day 7: submission
Day One:
1. I showed students a couple slides of an example. This gives students the big picture. The
example I use is for Theseus because students have to use a main character and Theseus, being a minor character, works well to model without giving or "stealing" the students' ideas.
example I use is for Theseus because students have to use a main character and Theseus, being a minor character, works well to model without giving or "stealing" the students' ideas.
2. Students select a main character and write that name at the top of the paper.
3. Students write a chronological list of all the decisions that character makes through the play. I encourage my students to use scene summaries and the play itself. I also have them sitting next to people who are doing the same character if they choose. That way they discuss and clarify what happened. I did set the students on a 10 minute timer for this portion so they would not lollygag.
4. Modeling with my list of options by Theseus, I selected three places where I will have a deviation. The requirement for my students were 2 deviations which leads to 3 separate themes with a total of 1000 words if they worked as individuals and 5 deviations which leads to 6 separate themes with a total of 2000 words if they work in partners. Students selected theirs. I encouraged students who want to do more and make things more complex to do so.
5. With my own index cards I modeled creating just the timeline for what actually happened in the play. I leave the deviations blank. I model a couple cards and then showed the kids my completed set of 8. The rest of the class time was for the kids to finish theirs.
Don't forget to see what I do Day 2 and Day 3.
Don't forget to see what I do Day 2 and Day 3.
Here are how my example cards looked. I use cards because each card will match up with the PowerPoint slide.
 |
| Cards: red numbers are what the card is, blue is the card it will link to. Card 1: title card |
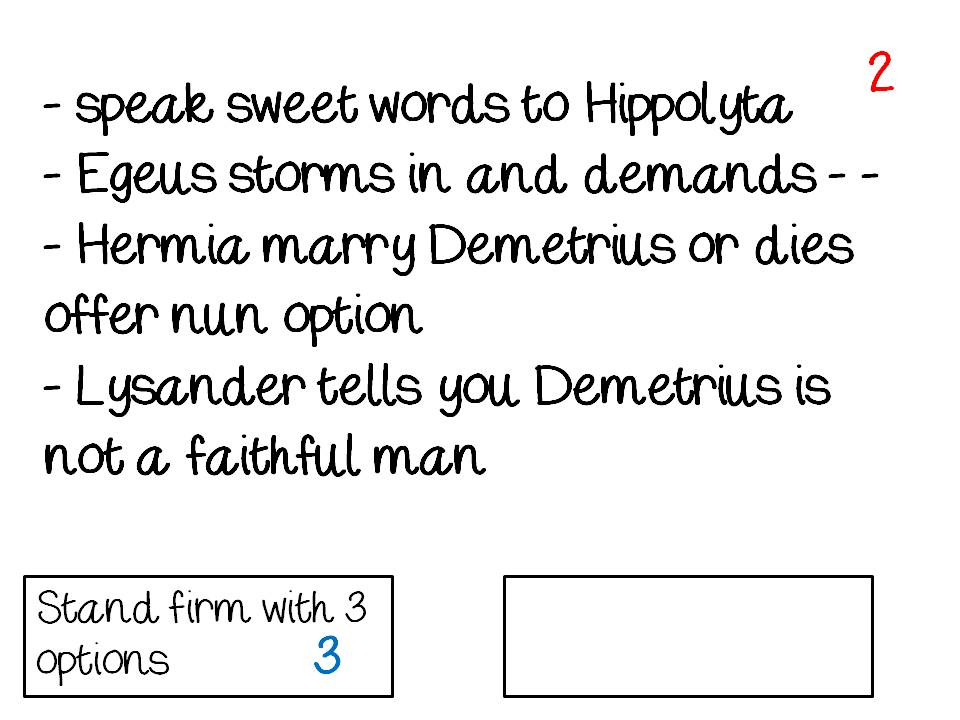 |
| Cards are notes/outline. Deviation Cards: for day 1, students are only marking the plot points that actually happened. The blank is where the deviation will be filled in later. |
 |
| Plot Point Cards: sometimes you have so much information you will need to split it up over several PPT slides or there is a setting change. That is when you use 1 button. |
 |
| Final slide includes the theme. |
No comments:
Post a Comment