Showing posts with label edtech. Show all posts

Wednesday, May 10, 2017

Sway Summary Synthesis

Blended learning is more that tech integration; it is about tailoring or allowing students some control  to meet needs of diverse learners. Students benefit with explicit instruction about how to find the right Lexile levels for them with Newsela, Readworks, and/or Common Lit.

For the lesson below, ability grouping works well for partners or groups. When working
collaboratively, those discussions about the task model the internal discussions students will need to have in future independent work.

Google classroom? Use Google Slides!

1. Students select an article from a source. You can give specific text sets in Newsela to focus discussion on text that supports current novel being read.
2. Group reads, making notes for a GIST summary of who, what, where, when, why, how and then write a 20 word GIST. Blended learning involves online instruction: create a video modelling GIST summarizing with a common text.
3. Students create a collaborative Sway for the 5W and H and 20 word GIST. Since it is collaborative, they can all work on it at the same time. 
4. Students share in a discussion board in an LMS or a platform like Edmodo.
5. Students critique at least 2 articles. Reading the article, viewing the Sway, and responding with one of the stems:
  • The summary needs more information about...
  • The summary is strong because...
  • I want to learn more about...
  • This reminds me of...
6. Groups go back to revise Sway. 

Use template below if you wish! Have students click on website link and save to their own Office 365 account. 


A huge shout out to JMozi for being the perfect fellow ELA tech educator to collaborate with! Philosophical alignment + different enough brains to build upon each other + a mutual respect = this lesson we co-created!

Sunday, February 5, 2017

Inforgraphics Made Easy

Easel.ly not only provides students with easy to create inforgraphics perfect for the classroom, it also provides teachers a very handy e-book guide. The guide shows teachers how to set up groups for students to login without providing an email address. All you have to do is create a login and they send you a link.

Additional tips and ideas:

  • Have students start with a template if they have not had infographic-making experience
  • There is already a place to insert a list of resources. My favorite resource for students to create MLA format is Purdue's OWL Lab.*
  • Encourage students to link images and information back to their source material 
  • Because students can get bogged down altering the aesthetics, create a classroom procedure of needing teacher approval before playing with color schemes and extras
  • Because some tech- and content-savvy students finish early, I like to offer lesson add-ons for students. These are challenges for students to take and incorporate into their projects. It gives students another skill, keeps them engaged, and won't result in kids trying to rush through their work to get the opportunity to play a computer game. These are sort of like those 5 minute filler lessons that we teachers have when a class finishes a lesson early, but individualized. A great add-on for Easel.ly is asking students to Blabberize on of their images. They create the Blabberize and then hyperlink the image on the Easel.ly to the Blabberize. Students could also create a Vocaroo to hyperlink. 

*I know that many people like Easy Bib or Citation Machine, but I find that students tend to still have errors in their bibliographies AND no understanding of how to read the information in the bibliography. If I want my students to be able to use bibliographies as readers, I have to teach them how to write them. I would personally rather a student make an error in a bibliography entry they wrote than an error is one from Easy Bib. Just my two cents for my middle school ELA classroom.


Saturday, November 5, 2016

Using Plickers for Status of the Class

Nancie Atwell's status of the class for determining which children are in which stages of the writing process can be applied to any class in which there is a multi-day and multi-step assignment.

You can create a Plicker question to represent the status options or create a blank Plicker question and ask it
on the fly. Use in art class, for PBL, writing workshop, etc.

It lets you instantly prioritize checking in/conferences, see if there are larger issues, and proactively take care of concerns before things spiral out of control. Additionally, if students need to peer conference, you have in your hand which students are looking for that and can pair them up easily.

Saturday, June 11, 2016

3D Gallery

Easy to use and apply this 3D Art Gallery by Classtools.net!


Art: create a digital portfolio of student work and student can include artist statements
Art: Artist study. Students can put work in chronological order.
History: To review an era, students can take well known works from that era and apply them. Students could also create questions for students to answer.
Science: Potential research project for the evolution of scientific discovery.
Science: diagrams for review with questions.
Science: research project about a particular scientist.
ELA: Visuals to connect for a novel study with text evidence and reasoning.
ELA: For texts in which history plays a large part (either historical fiction or works in which the time period of the author is highly influential), students conduct pre-reading or post-reading activities highlighting primary source visuals of events, people, and places and writing the significance to the text.

Saturday, June 4, 2016

5 Skill-Building Time Fillers for Computer

When you are in the computer lab as much as I am, telling students who are done with the assignment to go play an educational game becomes problematic. Students may rush to finish the assignment and not do their best. Students who work slower never get to play the game. Once you open up the computer to Cool Math Games "but only play the ones where you actually practice math! And no games that look like shooting!" as the teacher, you are now trying to monitor game selection, distracting you from helping students with the assignment. I find that classroom management issues can often be mitigated with sound lesson planning, and the filler minutes are no exception.

When looking at students creating a digital work, I think of add-ons: extra things students can do that will enhance their product, develop additional skills, and keep students engaged and on task even when "done." Here are some of my favs:

Blabberize -
What it does: gives an image a mouth that you can then make "talk"
What it is good for: any product. Students can download the video for multimedia products or can do the hyperlink option for interactive products where video where hyperlinking would be a better option such as word processors, Thinglink, or easel.ly. Print products would need a QR code added.

Voki 
What it does: similar to Blabberize, Voki provides avatars instead.
What it is good for: Because it can't be downloaded, Voki is better for an interactive product where the viewer can click on a  hyperlink  (example in my hyperlink!) Print products could us a QR code to connect

QR Stuff:
What it does: creates QR codes to link to text, webpages, etc.
What it is good for: if the finished product will be printed - posters, brochures, images - students can add a QR code that links to all sort of things: as text they could write and artist statement, create link to a webpage that includes more information. If the product can be posted to web, students can spend 5 minutes creating a flyer in a word processor with a QR code for their work and then print out the flyer and attach to their locker or give to their parents.

Thinglink:
What it does: makes images interactive with buttons that can lead to text, webpages, images, etc.
What it is good for: for products that are images - anything that can be saved as a jpeg - like collages, students can import into a Thinglink (there is a way to create a dummy student account. I would suggest creating one that can be used by all students instead of each student) and add links to sources or additional annotations.

Vocaroo:
What it does: records audio on the internet and provides link to the audio (audio is private and can only be accessed by a link)
What it is good for: interactive products or print. Student can embed, link, or hyperlink. If doing a print product, use QR Stuff to add in link.


Sunday, May 22, 2016

Choose Your Own Adventure Prewriting Lesson 5: Submitting

How to get a word count for Power Point

It is hard to get an accurate word count for PowerPoint. A quick search of the Internet shows that the

suggested method of selecting the file's properties and then looking in details is inaccurate. However, since I asked for a minimum of 1000 words for the presentation and I wanted it ran through turnitin.com, I wanted to make sure I could get the word count receipt.

Students need only convert the PPT to PDF and then submit the PDF to turnitin.com.* It will check the originality and count every word. Students turn in the receipt and the actual presentation to Edmodo.

*I checked turnitin.com with a simple submission of the PowerPoint presentation without it being converted to PDF and it reflected the same word count found when using the properties feature.


Example from PPT using word count the properties>details feature vs. converting to PDF and using turnitin.com: 


Word count using properties: 50
Word count using PDF version on Turnitin.com: 1,728

Choose Your Own Adventure Revising and Editing Lesson 4: Beta Testing

After students complete the presentation, students participated in "Beta Testing" which is similar to the conferencing and revising found in writing workshop.

Each presentation needed two people to beta testers. I had them fill out a beta testing form:
Beta Testing

Owner of the presentation: Set your presentation to presentation mode.
Beta tester: click through the presentation. If you need to uncover a slide number, you can press the ESC key, record the number, and then resume presentation from that slide

Does the PPT have 2 deviations (5 for partners)?

Does the PPT have 3 themes that seem accurate (6 for partners?)

Issues with hyperlinks: (ex: it doesn’t work, description doesn’t lead you to the slide that would make sense, etc.)

Accuracy issues:

Spelling or grammar issues (make sure to include slide numbers!):

Areas where you would like more details, info, imagery, dialogue (this may  not be for everyone, but you should especially let people know if their storylines feel skimpy)


Wednesday, May 18, 2016

Choose Your Own Adventure Formatting and Drafting Lesson 3: Set up PPT, Hyperlinking, Narrative Voice

Now that you finished index cards that follow the plot as well as those that deviate,  it is time to start creating the the PowerPoint, make hyperlinks, and draft.


Choose Your Own Adventure Prewriting Lesson 2: Create deviations from the plot

After completing day one of prewriting, it is on to day two: Deviation day! The kids love playing the "what if?" game and not only get a good dose of creative writing but also are secretly analyzing how those decisions influence theme.

1. In my example, the plot took 8 cards, so I model with my first deviation and have that become card 9. I also show students how, if they want, they could have deviations within deviations.
2. Students determine the new theme. (see my method of teaching theme here)
3. I do make sure each child has only one of each card and lays out their outline to show how it makes sense. 
adding in the deviations


Go to the next day, creating the PowerPoints, linking, and drafting. 

Choose Your Own Adventure Prewriting Lesson 1: Set up the plot

What a way to get kids to work and enjoy themselves at the same time! Students liken this project to writing fanfiction. So many of them are so excited after our first day that they tell me "I can't wait for tomorrow!" In my version, students create Choose Your Own Adventure PowerPoints (Google districts can use Slides, of course) for A Midsummer Night's Dream. This is, to me, a great project for a Shakespeare play. What makes this different than the typical Choose Your Own Adventure is that my students are working from a text they have read, thus making this both creative writing as well as reading comprehension and analysis all in one. 

What Choose Your Own Adventure asks students to do:

- review a plot of the play
- write prose paraphrasing the poetic drama
- show an understanding of the plot following one character
- creatively write deviations from the main plot
- determine a potential theme of the play and how the theme changes if a character's actions change
- use Hyperlinks within a presentation to go to non-linear slides


Overview:

Day 1: create cards for accurate timeline
Day 2: create cards for deviations
Day 3: set up slides and hyperlinks
Day 4: draft accurate timeline
Day 5: draft deviations
Day 6: beta testing with revising
Day 7: submission

Day One:

1. I showed students a couple slides of an example. This gives students the big picture. The
example I use is for Theseus because students have to use a main character and Theseus, being a minor character, works well to model without giving or "stealing" the students' ideas. 
2. Students select a main character and write that name at the top of the paper. 
3. Students write a chronological list of all the decisions that character makes through the play. I encourage my students to use scene summaries and the play itself. I also have them sitting next to people who are doing the same character if they choose. That way they discuss and clarify what happened. I did set the students on a 10 minute timer for this portion so they would not lollygag. 
4. Modeling with my list of options by Theseus, I selected three places where I will have a deviation. The requirement for my students were 2 deviations which leads to 3 separate themes with a total of 1000 words if they worked as individuals and 5 deviations which leads to 6 separate themes with a total of 2000 words if they work in partners. Students selected theirs. I encouraged students who want to do more and make things more complex to do so.
5. With my own index cards I modeled creating just the timeline for what actually happened in the play. I leave the deviations blank. I model a couple cards and then showed the kids my completed set of 8. The rest of the class time was for the kids to finish theirs.  

Don't forget to see what I do Day 2 and Day 3. 


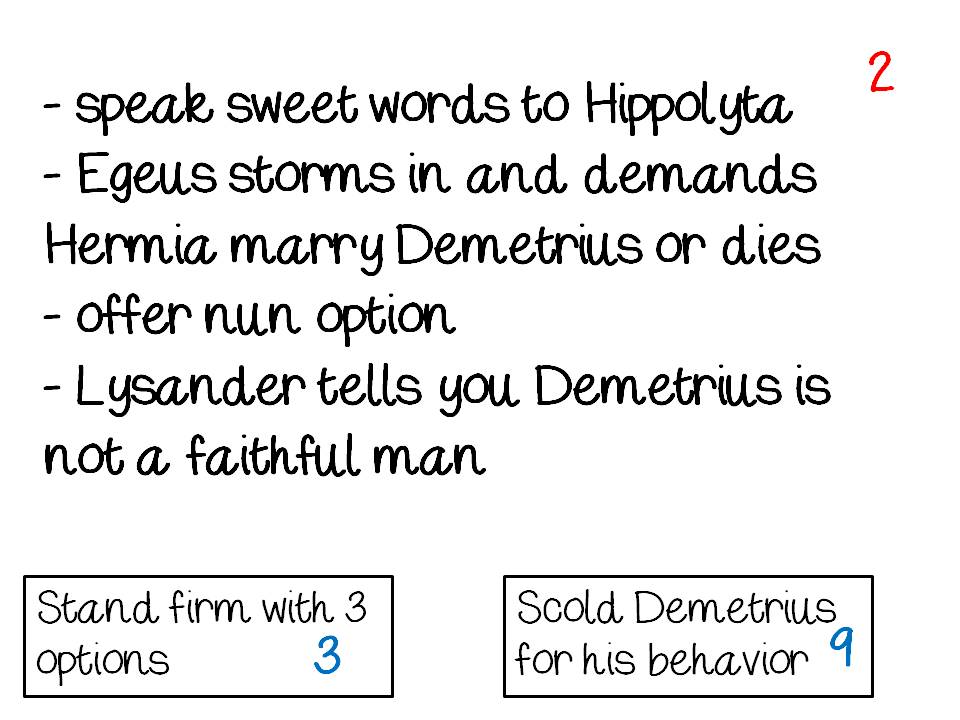
Here are how my example cards looked. I use cards because each card will match up with the PowerPoint slide. 


Cards: red numbers are what the card is,
blue is the card it will link to.
Card 1: title card


Cards are notes/outline.
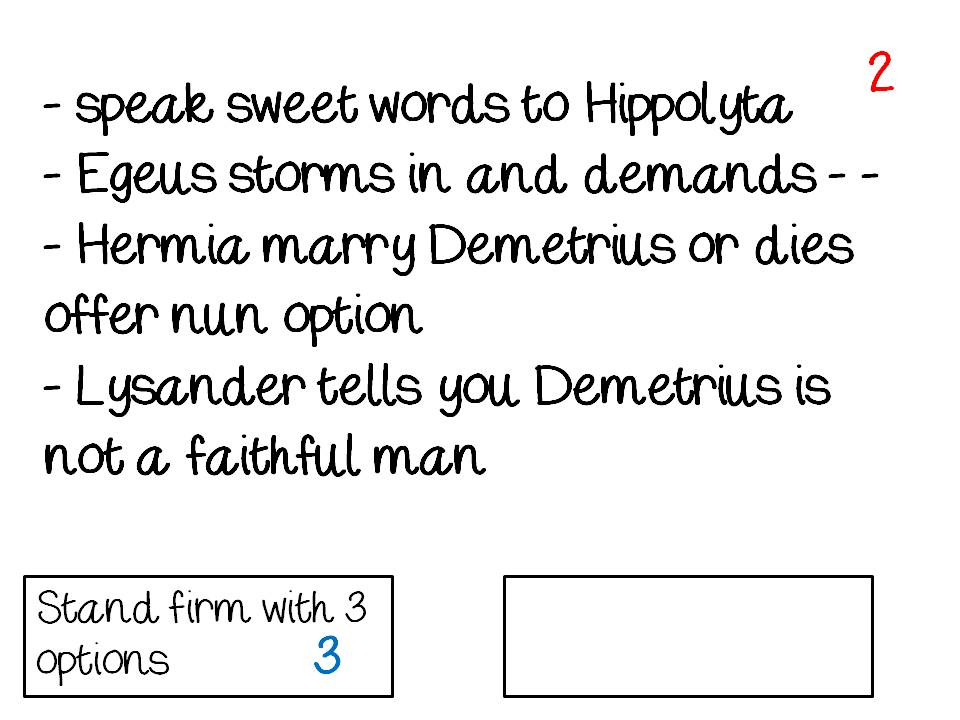
Deviation Cards: for day 1,
students are only marking the
plot points that actually
 happened.  The blank is where 
the deviation will be filled in later.


Plot Point Cards: sometimes you
have so much information you
will need to split it up over several
 PPT slides or there is a setting
change. That is when you use 1 button.

Final slide includes the theme.


Friday, April 29, 2016

Thinglink to Annotate Tableaus

Inspired by the Royal Shakespeare Company's use of student created tableau to foster close reading, I knew it would be a perfect pairing with Thinglink.
Analyzes movement to connect to motivation

Students select a moment in time to create a freeze frame, snap a picture to create a moment in time from the text, and then annotate the decisions they made in body, facial expression, proximity, and movement. The app is stripped down compared to the website, but it is easy to use with a picture students take of themselves if it is all on one device.
Analyzes proximity to reveal conflict.

The trickiest part is actually on the teacher end. Thinglink limits the amount of groups - 3 - and students - 105. So if you have class sizes like mine and 6 classes, you can't make a group for each class or give every kid a login. I decided to have one student per group request I register. Because the registration produces a dummy e-mail, complex password, and then I have to have students insert the class invite code, there are some steps that the students must take logging in that would not be friendly for younger students, but once they were in and students got into the app, I had very few questions and students were able to work through it fairly quickly.
Citation of lines that show the moment in time.


I also like that this is a shorter assignment. Students did their first one about half a period. I think if we did a second one, we could probably get the kids down to 15 minutes now that they understand how to login and use the app.


Sunday, April 24, 2016

Tagxedo to Analyze Diction

I'm a huge fan of diction analysis, and it is for sure an instructional emphasis in my classroom, which can sometimes make it feel redundant when we've been doing it all year long with every conceivable genre. That's the great thing about tech. You can have students do the same thing in tech that you've done in a very similar way on paper and the students don't even notice. The novelty makes the entire assignment feel fresh and creative. Gamification and tech, I've learned, are great ways to trick kids into practicing skills with renewed vigor!

My example created in the video. Super pretty, no? 

The end of the year we have fun with Shakespeare's A Midsummer Night's Dream. What better way to keep the kids engaged than by taking away the desks, putting on some fairy wings, and punning? 

The video pretty much says it all: add any text (I'm having my students pick a monologue from MSND) to Tagxedo , add the word cloud it into a presentation slide or word processor, pick out the 8-12 largest words, determine connections, write analysis for at least 5 of the words answering the question "Why?" - Why is this word being repeated? Why did the author choose this word and not ___?, save as a PDF and upload to whatever platform floats your boat!


Sunday, April 10, 2016

QR Code Museum Pieces

Turn your classroom - or school library - into a museum.


Student created art
Students create museum pieces and museum placards that indicate the information required. Perfect for history, prereading for historical novels, or post-reading for self-selected texts where each child can share an artifact from a book.


I wish I could show the kids' faces. There were smiles all around!

Students learn about lutes

Here are the directions for it as I applied it to pre-reading for Midsummer Night's Dream in which students examined the Elizabethan Era - so much better than a lecture from the teacher, right?


How I used this:

Shakespeare Centers (set up in ability groups of 3-5 with two of each type of center runnign concurrently)
Center A: Students participated in Shakespeare Museum
Center B: Students explored The Globe with the Shakespeare's Globe 360 App
Center C: Card Sort - advanced groups paired Shakespearean insults to their 21st century prose versions while struggling students worked on literary terms matched to examples from All the World's a Stage

Tuesday, April 5, 2016

Using ReadWriteThink to Simplify Differentiation

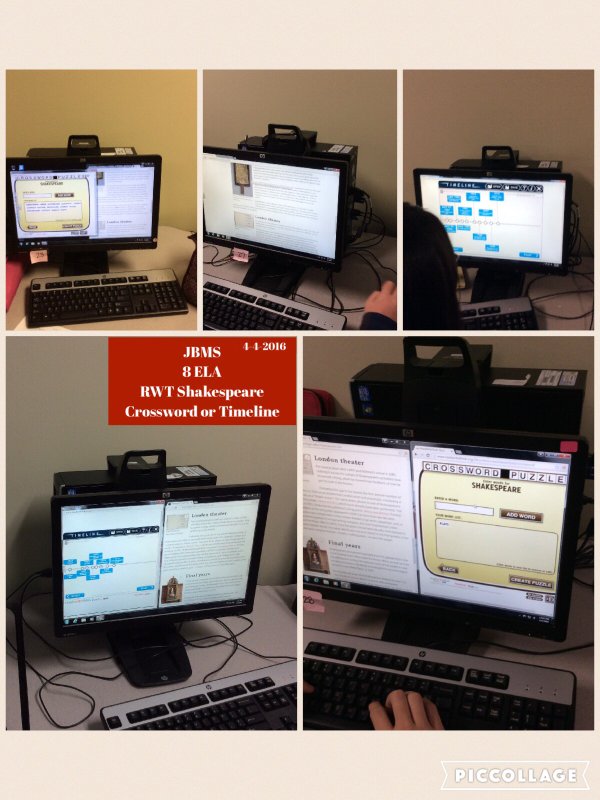
Instead of lecture on Shakespeare, I devoted two days to research of choice. Students researched 15 interesting things about Shakespeare and his time and got to choose the product they made. Students could make a crossword with Crossword Creator or the Timeline. Simplify the amount of info and make a Cube.

Thursday, March 31, 2016

Technology Integration Matrix

This is an amazing resource. Not only does it show the levels of technology integration with the characteristics of the learning environment, it does it for each subject area. You can see a video of integration with a procedures.


Thursday, March 10, 2016

Paper: the free app you never knew you absolutely needed

Paper touts itself as a note taking device - and what snazzy one! - and makes up for the weaknesses of some of the other note taking devices by seamlessly integrating pictures, annotations, and texts with an ease that required almost no time to acclimate to the user interface.

I love to take pictures at conferences, but with some of the other note-taking apps, taking a pic of the PowerPoint Slide and then annotating can be more of a hassle, making me lose valuable information. When using Paper, I can immediately begin writing on the picture, add text to the bottom, and be on my way.

It doesn't just stop at notes - which is what makes it so priceless! Lists and drawing diagrams. This makes it perfect for going upward into the higher level of Blooms by doing assignments like creating a charticle or diagram.

If Evernote and Doodle Splash had a baby that an elementary student could use, you'd have Paper. Just as versatile as its namesake, it is a must have for teachers and students. It goes right to the top of the list for students, who research shows are way more prone to taking a picture than typing something in an electronic planner, to be able to take a picture of the homework assignment on the board and quickly add whatever notes they need as well as interact with diagrams and other visuals they need throughout the day.

Saturday, February 20, 2016

Feature Writing as Summary

There are a hundred ways I could use the newspaper feature on www.fodey.com, but one of my favorites is the idea to have students respond to a chapter by writing a news article over it. I think it is great because it adds a creative aspect to retelling events. For my 8th graders, I would require that the headline needs to hint at a thematic issue or message.

I love how the website (1) lengthens the page so the end product can be short or long, (2) creates a downloadable image file that can be easily uploaded to Edmodo, Padlet, or incorporated into an appsmash, and (3) super authentic! It looks like the ink print from other newspapers has been left on it. This could create some really cool "historical" documents. I used to do a research project where students wrote diary entries from fictional or real characters in WWII. Wouldn't it be neat to have the end product of a research project like that be a fictional online archive?

For my example, I used The Outsiders. I had to research where the country may have been that the boys ran off to and what a viable date would be for the book, including the day of the week for that date. I had to imagine quotations from characters that seemed authentic to what we know about those characters.

Directions:
1. Think of what event happened in the book/chapter/story that would be front page worthy
2. Use the newspaper function on www.fodey.com (make sure to pause add blocker if you have that on your computer) to write a newspaper article that reveals the events
3. Use a maps website to come up with an accurate name for the newspaper and locations
4. Research the day of the week for an accurate date
5. Make sure your headline acknowledges a thematic component
6. In your summary, include a quotation from a character. This quotation should not be dialogue lifted from the text, but rather dialogue you create based on what you know about the characters and who a reporter would interview about this event


Monday, February 1, 2016

Text Smash/App Smash

With commonlit.org, creating a project-based learning experience is easy in that the website is organized by PBL questions! This makes it perfect for across text comparison and an opportunity for students to examine two texts answering the same question.

Thinking of across text comparison got me thinking of App Smashing - combining apps to make a project. So why not a text smash/app smash?

My instructions are specifically for The Outsiders, but check out my lesson flow on graphite to get a generic lesson that can fit no matter what whole class text your students have read.